I originally found the instructions for making my robe somewhere on the net, but I can't find the original page, so I've had to make do with translating my own notes for you. If it looks familiar and you can give me the link to the original please do.
This tutorial is aimed at people who probably haven't sewn any clothes before. If you can already sew and follow patterns you can probably come up with something a bit better, but this is fine if you need to make a basic robe.
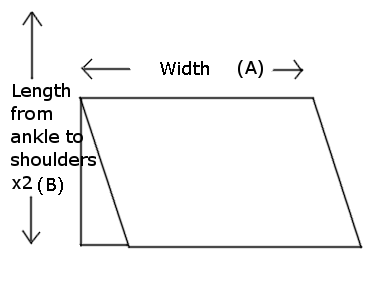
So first of all you need to find material of the right size that you like. I went for a cotton mix in black. It should be twice the length from your ankles to your shoulders. For the width get someone to measure your outstretched arms, wrist to wrist, you may want to add a couple of centimetres for hemming. You'll also need tailors chalk, or another way to mark out lines, a measuring tape, some pins, and a needle and thread (or sewing machine) to sew it up at the end. There's a bit of maths too, so a bit of brain power or a calculator is recommended.
Now these instructions might be a bit vague, I sort of went with what looked right at the time.
Step one
Fold material in half across the length (B), with the side you want to be the finished outside on the inside:
Step two
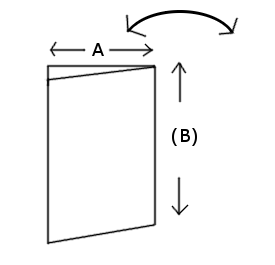
Fold in half again along the width (A):
Step three
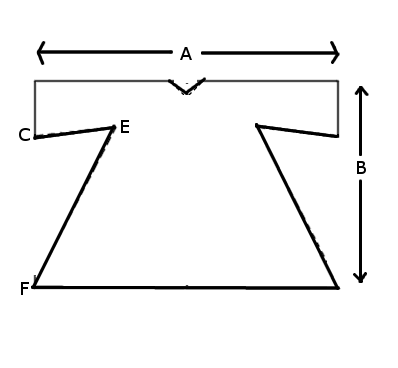
You'll need to take some measurements and the mark out the points as shown.
Point C is 35cm from the top edge
Point D is 30cm from the top edge
Point E is your chest measurement plus 20cm divided by 4, marked out from the right hand side.
Point F is 45 or 50cm from the right hand side
Join the points with straight lines using tailors chalk or equivalent.
Step four
Cut along the lines making sure you're cutting through all the layers of material at the same time. It might be useful to pin them together first to make sure they stay lined up.
Step five
(Unpin and) Unfold to the same position as in step one. Pin the together along the sides you will be sewing up. At this stage if you are very careful you may be able to try it on for a preview. Watch out for all the pins though! Especially against your face!
Now get sewing, and when you're done turn it the rightside out. Et voila! 1 robe.
I did mine by hand but I'm sure it would be a lot faster by machine. To start with I folded the hemmed the bottom and the sleeves (try it on again to check the length), then I sewed the rest. You could perhaps get a better finish if you used an overlocker but I think it's adequate for it's purpose. It will be quite baggy, because you need some room to get it on and off, but with a belt (usually cords) it looks fine.
I made the neck on mine too big and decided to sew a strip of ribbon around to make it smaller again, and the fabric I used wasn't very wide so I have three-quarter length sleeves. I may sew ribbon over the ends of the sleeves too, to match the collar.
Let me know if this works for you.
Let me know if this works for you.


No comments:
Post a Comment